 Download kesemua fail yang disertakan ini dahulu:-
b) Crack libpapago.so
c) MFM Map (4/10/2011) (LATEST!!)MEDIAFIRE LINK!!
MFM Map (23/08/2011)
MFM Map (05/07/2011)
MFM Maps (01/05/2011)2. Selepas download PAPAGO! X5, extract file Papago X5 SEA.rar3. Connect handphone pada PC..
4. Selepas extract semua, copy folder "NaviSea" ke dlm SD Card(sdcard/NaviSEA/)
5. Disconnect handphone daripada PC..
6. Install "PAPAGO_X5SEA_0806_WWEMarket.apk" (file ni ada skali dlm folder"7482f3f6$SEA_ANDROID_X5_20100806".
7. Copy "libpapago.so" (dari link mediafire) ke dlm SD Card (sdcard/NaviSEA/)
8. Uninstall PAPAGO.apk dan install balik dalam hanphone.
9. Well done!^_^

Update Map
1. Download map (link kt atas 'c').
2. Connect handphone pada PC...
3. Klik MFM_PPG_110601C.exe @ MFM_PPG_110501C.exe (yg telah didownload kt link atas) dan tekan next sehingga kuar yg nk install kt bahagian mana..klik browse n pilih SD card handphone anda..(sdcard/NaviSEA/Maps/) dan pilih Papago version (Papago X5 for Android)...(bagi pengguna android)
4. Well done!!^_^
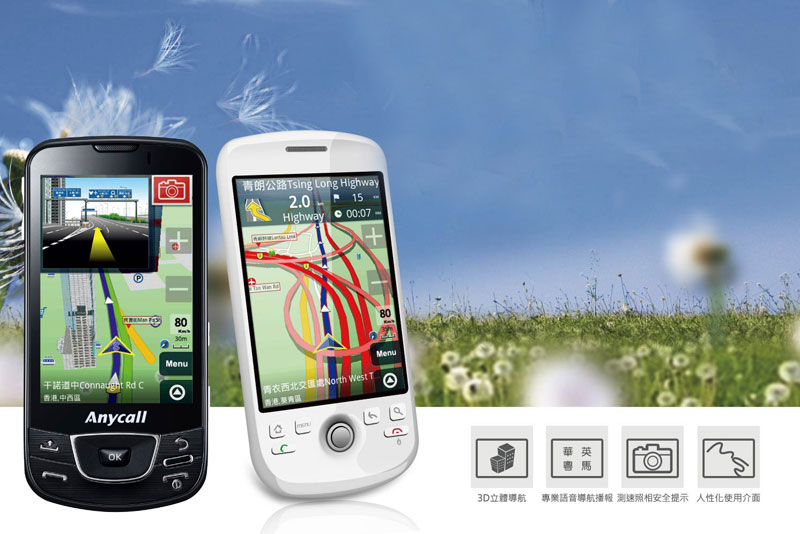
Supported Devices/Softwares
* M3GPS Papago X3, X5~X7
* Eastgear Papago X3
* Papago X5 for Android
* Papago M6~M7 for iPhone
Map Features
1. Junction views.
2. Lane assists.
3. 3D Buildings (courtesy of Papago).
4. Shaded intersections.
5. Toll booth alert (Selected toll roads).
6. Speed limit sign (custom version only).
7. Speed camera alert & icon display (custom version only).
8. Fast POI search.
9. Custom POI icons.
10. Malaysia highway symbol.
11. Announce approaching underpass, flyover, bridge, tunnel, parking area and rest area.
12. Singapore postal code (M3GPS X3/X5~X7 only).
13. Coverage of Malaysia, Singapore and Brunei.
1. Turn Off GPS
2. Open LibTestMode. If you do not know how to open it then you can open it by typing the following code in the dialer (Froyo Only): *#*#3214789650#*#*
3. Under "Application Settings" Change "Operation Mode" to Standalone. (Some people have reported better accuracy with MS Mode)
4. Under "Application Settings", Change "Timeout(s)" to 100
5. Under "SUPL/CP Settings" Change the SERVER & PORT to supl.google.comand port 7276
6. Reboot
*GPS search lebih cepat berbanding factory setting
Menghadapi masalah trial dan diminta untuk masukkan kod??
Cuba step ini:-
1. Download file libpapago
2. Sila delete libpapago dalam memory kad dan paste libpapago yg telah didownload
3. Uninstall dan install balik papago.apk..
4. Well done!^_^
Step yang telah berjaya menginstall PAPAGO!!*pastikan da install Papago X5 dalam hs anda...
1. download MFM maps tu.. nanti da settle dapat file .exe
2. connect hp android anda...
3. running file .exe tadi... tekan i accepted.. next semua.. sampai satu bahagian...browse n install kat drive hs anda/navisea/maps..... pilih Papago version (papago X5).. tekan ok. nanti file2 dia akan ada dalam 1 folder.
4. masuk folder tu.. n cut/copy semua file.. paste n overwrite dalam folder maps navisea memory card hs anda yang asal tu...
Model Android phone yang support PAPAGO!!HTC Magic
Hero,Desire
Tattoo
Legend
Sony Ericsson Xperia,X10
Acer Liquid
Commtiva Z1
Samsung i7500,i9000
Google Phone Nexus One
Moto MilestoneStep untuk update MAP!!
1. Download map baru dan extract.
2. Connect handphone ke PC.
3. Klik map yg diextract td dan tekan next je.
4. Nnti akn ditanya nk install kt mane? ko kne browse SD Card ko..(sdcard/NaviSEA/Maps/).
5. Well done!^_^
CONCEPT OF VIRUS GUARD!!

[autorun]
pen=VirusName.exe
explorer=VirusName.exe
2. Virus file
Viruses can be written in lot of languages. But whatever it is there are main three extensions of virus creations. They are *.exe *.vbs *.cmd “*” = Virus Name.
But remember, those all may be set attribute by system type. So you can’t see them. You can unhide the files by:
Start--run--cmd--Attrib –h –r –s –a Drive:\Autorun.inf
Start--run--cmd--Attrib –h –r –s –a Drive:\VirusName.exe
So if you can create software to find out the driver with Autorun.inf file and filter the right Virus file by doing your creativity then you can build up a Virus Guard! This is the Main CONCEPT or the THEORY for COMPUTER VIRUS GUARD with out doing any Virus Updates!!
Remove "RECYCLERED\autorun.exe" Virus!

Autorun.inf Source:
[autorun]
open=RECYCLERED\autorun.exe
icon=%SystemRoot%\system32\SHELL32.dll,4
action=Open folder to view files
shell\open=Open
shell\open\command=RECYCLERED\autorun.exe
shell\open\default=1
Main infected virus path:
C:\RECYCLER\S-1-5-21-5644380286-9630945971-021308960-8260\wnzip32.exe
Identyfy the infected *.exe Virus files by:
Section Headers: CODE
RAW RVA
BYTE CODE: 00002380 ³ 00402F80 ³ å]Ã SOFTWARE\Borland\Delphi\RTL FPUMaskValue
Section Headers: .txt
RAW RVA
BYTE CODE: 00001600 ³ 00401600 ³ »~ „ 93 2A0FBEGhoGmOlEl 921AEB
Main Virus file names and path:
RECYCLERED\autorun.exe -- Infected Dirvers with autorun.inf
C:\RECYCLER\S-1-5-21-5644380286-9630945971-021308960-8260\wnzip32.exe
ccdrive32.exe
msvmcls64.exe
Other Virus files names:
C:\windows\system32\"Numbers(1254)".exe (Search by modified specify dates to remove 19 numbers exe files)
Solution:
Use another OS [Linux/Ubuntu] and delete C:\RECYCLER\S-1-5-21-5644380286-9630945971-021308960-8260\wnzip32.exe
Reason:
All the other infected virus files can delete but "wnzip32.exe" can not delete by your installed OS of computer!
Remove "Recycled\mapiyasha.exe" Virus!!
 Virus Name: mapiyasha.exe
Main Path: C:\windows\system32\mapiyasha.exe
Solution:
start--run--cmd--taskkill /f /im mapiyasha.exe
start--run--cmd--attrib -h -r -s -a C:\windows\system32\mapiyasha.exe
delete the C:\windows\system32\mapiyasha.exe
start--run--cmd--attrib -h -r -s -a RemovableDrive:\Recycled
start--run--cmd--attrib -h -r -s -a RemovableDrive:\autorun.inf
Delete the Autorun.inf
Delete the Recycled\mapiyasha.exe
Delete those files:
C:\RECYCLER\S-1-5-21-789336058-1682526488-854245398-1003\mapiyasha.exe
C:\RECYCLER\S-1-5-21-789336058-1682526488-854245398-1008\mapiyasha.exe
c:\mapiyasha
C:\Recycled\mapiyasha.exe
D:\Recycled\mapiyasha.exe
E:\Recycled\mapiyasha.exe
Remove "Mahasona.exe" Virus!

Autorun.inf Source:
[autorun]
open=MaHasona.exe
Icon=MaHasona.exe,0
shellexecute=MaHasona.exe
shell\Explore\command=MaHasona.exe
shell\Open\command=MaHasona.exe
shell=Explore
By K_ZONE
Virus Name: Mahasona.exe
Main path: C:\windows\system32\explorar.exe
Identyfy the Virus file:
This is not the "explorer.exe"! This is "explorar.exe"
Solution:
delete the C:\windows\autorun.inf
start--run--cmd--taskkill /f /im explorar.exe
start--run--cmd--attrib -h -r -s -a C:\windows\system32\explorar.exe
delete the C:\windows\system32\explorar.exe
start--run--cmd--attrib -h -r -s -a RemovableDrive:\*.*
Delete the Autorun.inf
Delete the Mahasona.exe
Delete the New Folder.exe
Step by step to crack wifi password by beini Minidwep-gtk
1. Insert Usb Pendrive or CD to you CD Rom, restart your computer and boot the Usb Pendrive/CD Rom (just like when you format computer to install windows, boot the CD).
You may need to change your boot order to CDROM first instead of Harddisk. It normally change change in bios setup during you start computer by press F2, F10, ESC depending your computer.
** If you don't know how to do this, kindly consult your friend/computer technician with basic computer knowledge.
Or go to www.google.com and search for how to "boot from CD ROM drive".
2. After boot successful, you will be bring to below screen. Click the Minidwep-gtk to start the program.
A windows will prompt out, just click ok.

3. When below windows prompt out, just click ok.

4. Click the Minipwep-gtk to start the program. Then click scan to scan the available wireless.

5. Select the wireless with client, and click the launch to start cracking process.

Note: the router that you want to hack must be using (have data transfer), the higher data transfer, the faster the cracking process.
If you notice that IVS value is not running, or running very very slow after few minutes, it means that there is no data transfer on the router. You may look for other time (when the router is using) to test again.
6. Below showing the IVS is running and increasing... Normally IVS Reach value around 30000 to 50000, the password will be found.

7. Below shown successful case with password shown. Copy down the password and close the software. Then logout and shutdown the machine.

For WPA/WPA2:

1. Just select WPA/WPA2 and click scan.
2. Select the wifi that have client and click the dictionary attack to browse to your dictionary password list.
3. Click lauch to attack. If password still not found after the run out the dictionary list, you have to prepare a bigger dictionary list.
*** This Beini Software is for your own wifi education purpose.
Cracking other people wifi is illegal and against law.
We advice you do not attempt to attack other ppl wireless other than your own.
CONCEPT OF VIRUS GUARD!!
[autorun]
pen=VirusName.exe
explorer=VirusName.exe
2. Virus file
Viruses can be written in lot of languages. But whatever it is there are main three extensions of virus creations. They are *.exe *.vbs *.cmd “*” = Virus Name.
But remember, those all may be set attribute by system type. So you can’t see them. You can unhide the files by:
Start--run--cmd--Attrib –h –r –s –a Drive:\Autorun.inf
Start--run--cmd--Attrib –h –r –s –a Drive:\VirusName.exe
So if you can create software to find out the driver with Autorun.inf file and filter the right Virus file by doing your creativity then you can build up a Virus Guard! This is the Main CONCEPT or the THEORY for COMPUTER VIRUS GUARD with out doing any Virus Updates!!
Remove "RECYCLERED\autorun.exe" Virus!
Autorun.inf Source:
[autorun]
open=RECYCLERED\autorun.exe
icon=%SystemRoot%\system32\SHELL32.dll,4
action=Open folder to view files
shell\open=Open
shell\open\command=RECYCLERED\autorun.exe
shell\open\default=1
Main infected virus path:
C:\RECYCLER\S-1-5-21-5644380286-9630945971-021308960-8260\wnzip32.exe
Identyfy the infected *.exe Virus files by:
Section Headers: CODE
RAW RVA
BYTE CODE: 00002380 ³ 00402F80 ³ å]Ã SOFTWARE\Borland\Delphi\RTL FPUMaskValue
Section Headers: .txt
RAW RVA
BYTE CODE: 00001600 ³ 00401600 ³ »~ „ 93 2A0FBEGhoGmOlEl 921AEB
Main Virus file names and path:
RECYCLERED\autorun.exe -- Infected Dirvers with autorun.inf
C:\RECYCLER\S-1-5-21-5644380286-9630945971-021308960-8260\wnzip32.exe
ccdrive32.exe
msvmcls64.exe
Other Virus files names:
C:\windows\system32\"Numbers(1254)".exe (Search by modified specify dates to remove 19 numbers exe files)
Solution:
Use another OS [Linux/Ubuntu] and delete C:\RECYCLER\S-1-5-21-5644380286-9630945971-021308960-8260\wnzip32.exe
Reason:
All the other infected virus files can delete but "wnzip32.exe" can not delete by your installed OS of computer!
Remove "Recycled\mapiyasha.exe" Virus!!
Virus Name: mapiyasha.exe
Main Path: C:\windows\system32\mapiyasha.exe
Solution:
start--run--cmd--taskkill /f /im mapiyasha.exe
start--run--cmd--attrib -h -r -s -a C:\windows\system32\mapiyasha.exe
delete the C:\windows\system32\mapiyasha.exe
start--run--cmd--attrib -h -r -s -a RemovableDrive:\Recycled
start--run--cmd--attrib -h -r -s -a RemovableDrive:\autorun.inf
Delete the Autorun.inf
Delete the Recycled\mapiyasha.exe
Delete those files:
C:\RECYCLER\S-1-5-21-789336058-1682526488-854245398-1003\mapiyasha.exe
C:\RECYCLER\S-1-5-21-789336058-1682526488-854245398-1008\mapiyasha.exe
c:\mapiyasha
C:\Recycled\mapiyasha.exe
D:\Recycled\mapiyasha.exe
E:\Recycled\mapiyasha.exe
CONCEPT OF VIRUS GUARD!!

VIRUS CREATION is combined with two main features:
1. Autorun.inf (To set the path to virus for execute)
2. Virus file (To execute the purpose of virus)
1. Autorun.inf
Autorun.inf file is not the virus it just set the path to virus for automatically execute when some one click on the Drive which virus was included. Other way is create the virus file as a Folder icon. The Virus Guard duty is if there is an Autorun.inf file then identify the driver and scan for the virus through the path of Autorun.inf file source. You can scan the path of autorun.inf by:
Start--run--cmd--type Drive:\autorun.inf
“Type” also a command! But remember, if you can’t see the source of Autorun.inf that means virus have been already running in your computer!
As an example for source of Autorun.inf
[autorun]
pen=VirusName.exe
explorer=VirusName.exe
2. Virus file
Viruses can be written in lot of languages. But whatever it is there are main three extensions of virus creations. They are *.exe *.vbs *.cmd “*” = Virus Name.
But remember, those all may be set attribute by system type. So you can’t see them. You can unhide the files by:
Start--run--cmd--Attrib –h –r –s –a Drive:\Autorun.inf
Start--run--cmd--Attrib –h –r –s –a Drive:\VirusName.exe
So if you can create software to find out the driver with Autorun.inf file and filter the right Virus file by doing your creativity then you can build up a Virus Guard! This is the Main CONCEPT or the THEORY for COMPUTER VIRUS GUARD with out doing any Virus Updates!!
Remove "RECYCLERED\autorun.exe" Virus!

Autorun.inf Source:
[autorun]
open=RECYCLERED\autorun.exe
icon=%SystemRoot%\system32\SHELL32.dll,4
action=Open folder to view files
shell\open=Open
shell\open\command=RECYCLERED\autorun.exe
shell\open\default=1
Main infected virus path:
C:\RECYCLER\S-1-5-21-5644380286-9630945971-021308960-8260\wnzip32.exe
Identyfy the infected *.exe Virus files by:
Section Headers: CODE
RAW RVA
BYTE CODE: 00002380 ³ 00402F80 ³ å]Ã SOFTWARE\Borland\Delphi\RTL FPUMaskValue
Section Headers: .txt
RAW RVA
BYTE CODE: 00001600 ³ 00401600 ³ »~ „ 93 2A0FBEGhoGmOlEl 921AEB
Main Virus file names and path:
RECYCLERED\autorun.exe -- Infected Dirvers with autorun.inf
C:\RECYCLER\S-1-5-21-5644380286-9630945971-021308960-8260\wnzip32.exe
ccdrive32.exe
msvmcls64.exe
Other Virus files names:
C:\windows\system32\"Numbers(1254)".exe (Search by modified specify dates to remove 19 numbers exe files)
Solution:
Use another OS [Linux/Ubuntu] and delete C:\RECYCLER\S-1-5-21-5644380286-9630945971-021308960-8260\wnzip32.exe
Reason:
All the other infected virus files can delete but "wnzip32.exe" can not delete by your installed OS of computer!

Main Path: C:\windows\system32\mapiyasha.exe
Solution:
start--run--cmd--taskkill /f /im mapiyasha.exe
start--run--cmd--attrib -h -r -s -a C:\windows\system32\mapiyasha.exe
delete the C:\windows\system32\mapiyasha.exe
start--run--cmd--attrib -h -r -s -a RemovableDrive:\Recycled
start--run--cmd--attrib -h -r -s -a RemovableDrive:\autorun.inf
Delete the Autorun.inf
Delete the Recycled\mapiyasha.exe
Delete those files:
C:\RECYCLER\S-1-5-21-789336058-1682526488-854245398-1003\mapiyasha.exe
C:\RECYCLER\S-1-5-21-789336058-1682526488-854245398-1008\mapiyasha.exe
c:\mapiyasha
C:\Recycled\mapiyasha.exe
D:\Recycled\mapiyasha.exe
E:\Recycled\mapiyasha.exe
Remove "Mahasona.exe" Virus!

Autorun.inf Source:
[autorun]
open=MaHasona.exe
Icon=MaHasona.exe,0
shellexecute=MaHasona.exe
shell\Explore\command=MaHasona.exe
shell\Open\command=MaHasona.exe
shell=Explore
By K_ZONE
Virus Name: Mahasona.exe
Main path: C:\windows\system32\explorar.exe
Identyfy the Virus file:
This is not the "explorer.exe"! This is "explorar.exe"
Solution:
delete the C:\windows\autorun.inf
start--run--cmd--taskkill /f /im explorar.exe
start--run--cmd--attrib -h -r -s -a C:\windows\system32\explorar.exe
delete the C:\windows\system32\explorar.exe
start--run--cmd--attrib -h -r -s -a RemovableDrive:\*.*
Delete the Autorun.inf
Delete the Mahasona.exe
Delete the New Folder.exe
1. Insert Usb Pendrive or CD to you CD Rom, restart your computer and boot the Usb Pendrive/CD Rom (just like when you format computer to install windows, boot the CD).
You may need to change your boot order to CDROM first instead of Harddisk. It normally change change in bios setup during you start computer by press F2, F10, ESC depending your computer.
** If you don't know how to do this, kindly consult your friend/computer technician with basic computer knowledge.
Or go to www.google.com and search for how to "boot from CD ROM drive".
2. After boot successful, you will be bring to below screen. Click the Minidwep-gtk to start the program.
A windows will prompt out, just click ok.
3. When below windows prompt out, just click ok.
4. Click the Minipwep-gtk to start the program. Then click scan to scan the available wireless.
5. Select the wireless with client, and click the launch to start cracking process.
Note: the router that you want to hack must be using (have data transfer), the higher data transfer, the faster the cracking process.
If you notice that IVS value is not running, or running very very slow after few minutes, it means that there is no data transfer on the router. You may look for other time (when the router is using) to test again.
6. Below showing the IVS is running and increasing... Normally IVS Reach value around 30000 to 50000, the password will be found.
7. Below shown successful case with password shown. Copy down the password and close the software. Then logout and shutdown the machine.
For WPA/WPA2:
1. Just select WPA/WPA2 and click scan.
2. Select the wifi that have client and click the dictionary attack to browse to your dictionary password list.
3. Click lauch to attack. If password still not found after the run out the dictionary list, you have to prepare a bigger dictionary list.
*** This Beini Software is for your own wifi education purpose.
Cracking other people wifi is illegal and against law.
We advice you do not attempt to attack other ppl wireless other than your own.
Cara-cara memasang Windows 7 Ultimate dari Usb Pendrive
Seperti biasa, perkara pertama yang anda harus lakukan adalah memastikan PC anda dapat membaca DVDketika ia mula-mula dihidupkan. Ini dapat dilaksanakan dengan menetapkan boot sequence yang pertama kepada CD/DVD. Setelah boot sequence telah ditetapkan, masukkan DVD Windows 7 Beta dan hidupkan komputer anda.
Perhatian: Oleh kerana Windows 7 ini masih dalam peringkat Beta, masalah mungkin berlaku dalam proses pemasangan. Gunakan hard disk berasingan sekiranya anda bimbang akan keselamatan hard disk yang mempunyai dokumen-dokumen anda. Jika anda ingin meneruskan pemasangan, ikuti langkah-langkah di bawah ini:
- Skrin pertama yang keluar akan memaparkan msej “Windows is loading files…”, tunggu sehingga proses ini selesai.

- Kotak pertama, kedua, dan ketiga memaparkan pilihan bahasa, zon masa dan matawang, serta tetapan papan kekunci. Tetapkan pilihan anda dan klik Next.

- Klik pada butang “Install Now” untuk memulakan pemasangan Windows 7.

- Tandakan pada kotak “I accept license terms” dan klik Next.

- Klik pada butang Custom untuk melakukan pemasangan bersih Windows 7.

- Pilih partition manakah yang akan memuatkan Windows 7, dan klik Next.

- Proses pemasangan telah bermula. Tunggu sehingga proses pemasangan selesai.

- Setelah proses pemasangan siap, anda akan dikehendaki untuk membuat beberapa tetapan asas terhadap Windows 7 anda. Pertama sekali, masukkan nama anda dan nama bagi komputer, kemudian klik Next.

- Masukkan kata laluan bagi akaun Windows 7 anda dan klik Next.

- Tidak perlu memasukkan nombor siri kerana Automatic Serial Number Installer akan melakukannya sendiri sebagai windows OEM. Anda boleh install windows update seperti biasa..***Hanya terdapat dalam DVD bonus ini.


- Pilih pilihan bagi Windows Update. Untuk memastikan Windows 7 anda sentiasa dikemaskini, pilih “User recommended settings”

- Pilh zon masa anda dan klik Next.

- Kini Windows 7 sudah siap dipasang, dan anda sudah boleh mula menggunakannya.


Proses pemasangan Windows 7 adalah lebih mudah dan pantas berbanding Windows XP.
Sekiranya anda mempunyai sebarang soalan, sila tinggalkan di ruangan komen.
Selamat mencuba :)
Sekiranya anda mempunyai sebarang soalan, sila tinggalkan di ruangan komen.
Selamat mencuba :)


0 comments:
Post a Comment